

Hello everyone!
Today, we would be looking at how to create forms with react-hook-form as opposed to the conventional react forms using the useState hook. Creating forms in react could be tricky, it involves managing all input states and their validation. React Hook Form is a library that helps you validate forms in React.
Please note that you should know how React useState hook work with forms before proceeding with this article.
How to create a form without the react-hook-form library:
import React, { useState } from "react";
import "./styles.css";

export default function Login() {
  const [formInputs, setFormInputs] = useState({
    email: "",
    password: ""
  });

  const handleChange = (event) => {
    const { name, value } = event.target;
    setFormInputs((prev) => ({
      ...prev,
      [name]: value
    }));
  };

  const handleSubmit = (event) => {
    event.preventDefault();
    console.log(formInputs);
    //any other logic goes here
  };

  return (
    <div className="App">
      <form onSubmit={handleSubmit}>
          <input
            type="text"
            name="email"
            value={formInputs.email}
            onChange={handleChange}
          />
          <input
            type="password"
            name="password"
            value={formInputs.password}
            onChange={handleChange}
          />
          <button type="submit">Login</button>
      </form>
    </div>
  );
}
This already looks like a whole bunch of code that could be refactored using react-hook-form, so let's dive right into it.
So to convert the above code into a simple form using react-hook-form, Let's use the following steps below.
How to use react-hook-form
Step 1:
Install the react-hook-form library, we install it using npm or yarn. In our case, we would be using npm.
npm install react-hook-form
Step 2:
Import the useForm hook from the react-hook-form library.
import { useForm } from "react-hook-form"
Step 3:
remove the state we created, the handleSubmit function, the value and the onChange props, then import the useForm hook.
import { useForm } from 'react-hook-form';

export default function Login() {
  const { register, handleSubmit } = useForm();

  return (
    <div>
      <form>
        <input type='email' />
        <input type='password' />
      </form>
    </div>
  );
}
Step 4:
Call the register function as a prop in the input to register each input with a name so that we can retrieve its value.
import { useForm } from 'react-hook-form';

export default function Login() {
  const { register, handleSubmit } = useForm();

  return (
    <div>
      <form>
        <input type='email' {...register("email")}/>
        <input type='password' {...register("password")}/>
      </form>
    </div>
  );
}
Step 5:
Submit the form by calling the handleSubmit function provided by the react-hook-form library.
import { useForm } from 'react-hook-form';

export default function Login() {
  const { register, handleSubmit } = useForm();
const onSubmit = data => console.log(data)
  return (
    <div>
      <form handleSubmit={onSubmit}>
        <input type='email' {...register("email")/>
        <input type='password' {...register("password")/>
      </form>
    </div>
  );
}
This is how the final output looks on the console, the stored data can be manipulated to suit your preference.

How to add validation to the form:
Let's try adding a required field, the regex for email validation and a minimum and maximum length to the input fields.
Step 1:
Pass an object to the register function as a second parameter
import { useForm } from 'react-hook-form';

export default function Login() {
  const { register, handleSubmit } = useForm();
const onSubmit = data => console.log(data)
  return (
    <div>
      <form handleSubmit={onSubmit}>
        <input type='email' {...register("email",
        {
        required: {
        value: true,
        message: "Email is required!",
         },
        pattern: {
        value: /^[^\s@]+@[^\s@]+\.[^\s@]{2,}$/i,
        message: "This is not a valid email format!",
         },
         }
        )/>
        <input type='password' {...register("password",
          {
          required: {
          value: true,
          message: "Password is Required!"
          },
          minLength:
         {
          value: 4,
          message: "Password must be more than 4 characters",
          },
         maxLength: {
         value: 10,
         message: "Password cannot exceed more than 10 characters"
        }
        })/>
      </form>
    </div>
  );
}
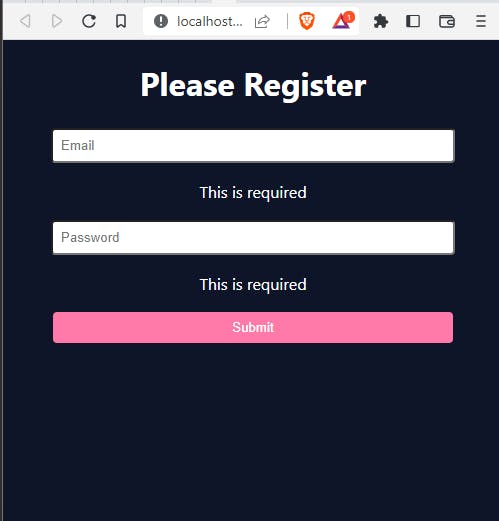
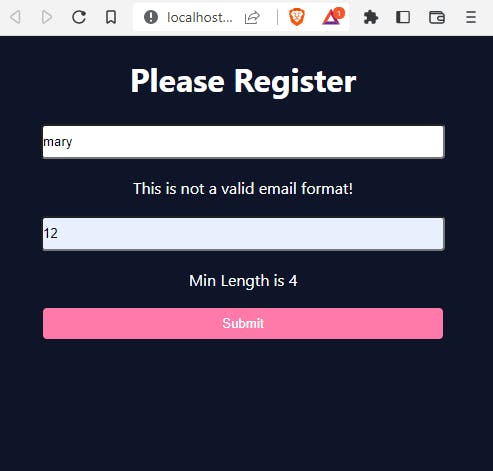
Here we validated the form by making sure that the input fields are not submitted blank, we provided the regex pattern to be followed and we specified that the minimum length of the password field should not be less than 4 and the maximum length should not exceed 10.
Step 2:
When validation fails, We display the error message by calling the formState from the errors object. In our case, we would be using a <p> tag.
import { useForm } from 'react-hook-form';

export default function Login() {
  const { register, handleSubmit, formState: {errors} } = useForm();
const onSubmit = data => console.log(data)
  return (
    <div>
      <form handleSubmit={onSubmit}>
        <input type='email' {...register("email",
        {
        required: {
        value: true,
        message: "Email is required!",
         },
        pattern: {
        value: /^[^\s@]+@[^\s@]+\.[^\s@]{2,}$/i,
        message: "This is not a valid email format!",
         },
         }
        )/>
         <p>{errors.email?.message}</p>
        <input type='password' {...register("password",
          {
          required: {
          value: true,
          message: "Password is Required!"
          },
          minLength:
         {
          value: 4,
          message: "Password must be more than 4 characters",
          },
         maxLength: {
         value: 10,
         message: "Password cannot exceed more than 10 characters"
        }
        })/>
        <p>{errors.password?.message}</p>
      </form>
    </div>
  );
}
your output should look like this after validation:
Adding Default Values to the form
Using Default values we can add initial values to inputs by defining them in our useForm hook just like we do it using the useState hook.
import { useForm } from 'react-hook-form';

export default function Login() {
  const { register, handleSubmit, formState: {errors} } = useForm({
   defaultValues: {
   email: "",
   password: ""});
const onSubmit = data => console.log(data)
  return (
    <div>
      <form handleSubmit={onSubmit}>
        <input type='email' {...register("email",
        {
        required: {
        value: true,
        message: "Email is required!",
         },
        pattern: {
        value: /^[^\s@]+@[^\s@]+\.[^\s@]{2,}$/i,
        message: "This is not a valid email format!",
         },
         }
        )/>
         <p>{errors.email?.message}</p>
        <input type='password' {...register("password",
          {
          required: {
          value: true,
          message: "Password is Required!"
          },
          minLength:
         {
          value: 4,
          message: "Password must be more than 4 characters",
          },
         maxLength: {
         value: 10,
         message: "Password cannot exceed more than 10 characters"
        }
        })/>
        <p>{errors.password?.message}</p>
      </form>
    </div>
  );
}
Conclusion
The react-hook-form helps to simplify our code, minimizes validation computation and also helps us write lesser code blocks. It also gets rid of needless re-renders.
To gain access to the code, here is the link on GitHub.
You can also read and explore more about the react-hook-form on their website.